YOUR CONVERSATION, ELEVATED
Stay present.
Be prepared.
Move forward.
Your practical guide to Cue — from the first sign-in to the moment a great conversation becomes a clear next step.
WELCOME TO CUE
More confidence.
Less mental juggling.
Cue brings preparation, live guidance, and meeting intelligence into one workspace. Use this guide to make it yours, understand the controls, and turn your next conversation into progress.
Follow the numbered steps. Bold words match product controls. Screenshots use demonstration data. Start with a practice call and explore at your own pace.
Your invitation. Your workspace.
Activate your account
- Open your personal Cue welcome email and select Activate your account. Use the intended email address; keep the unique setup link private.
- On the setup page, enter a unique 12–128 character password under New password, repeat it under Confirm password, and select Activate account. Then select Sign in to Cue and use your new password. No reusable password is emailed.
- If the invitation is expired or has already been used, ask your inviter for a fresh invitation. Do not create a second account to work around an expired link.
- Check any complimentary-access, trial, or discount terms shown for your account. Note the end date and what happens afterward. Your account’s terms govern access.
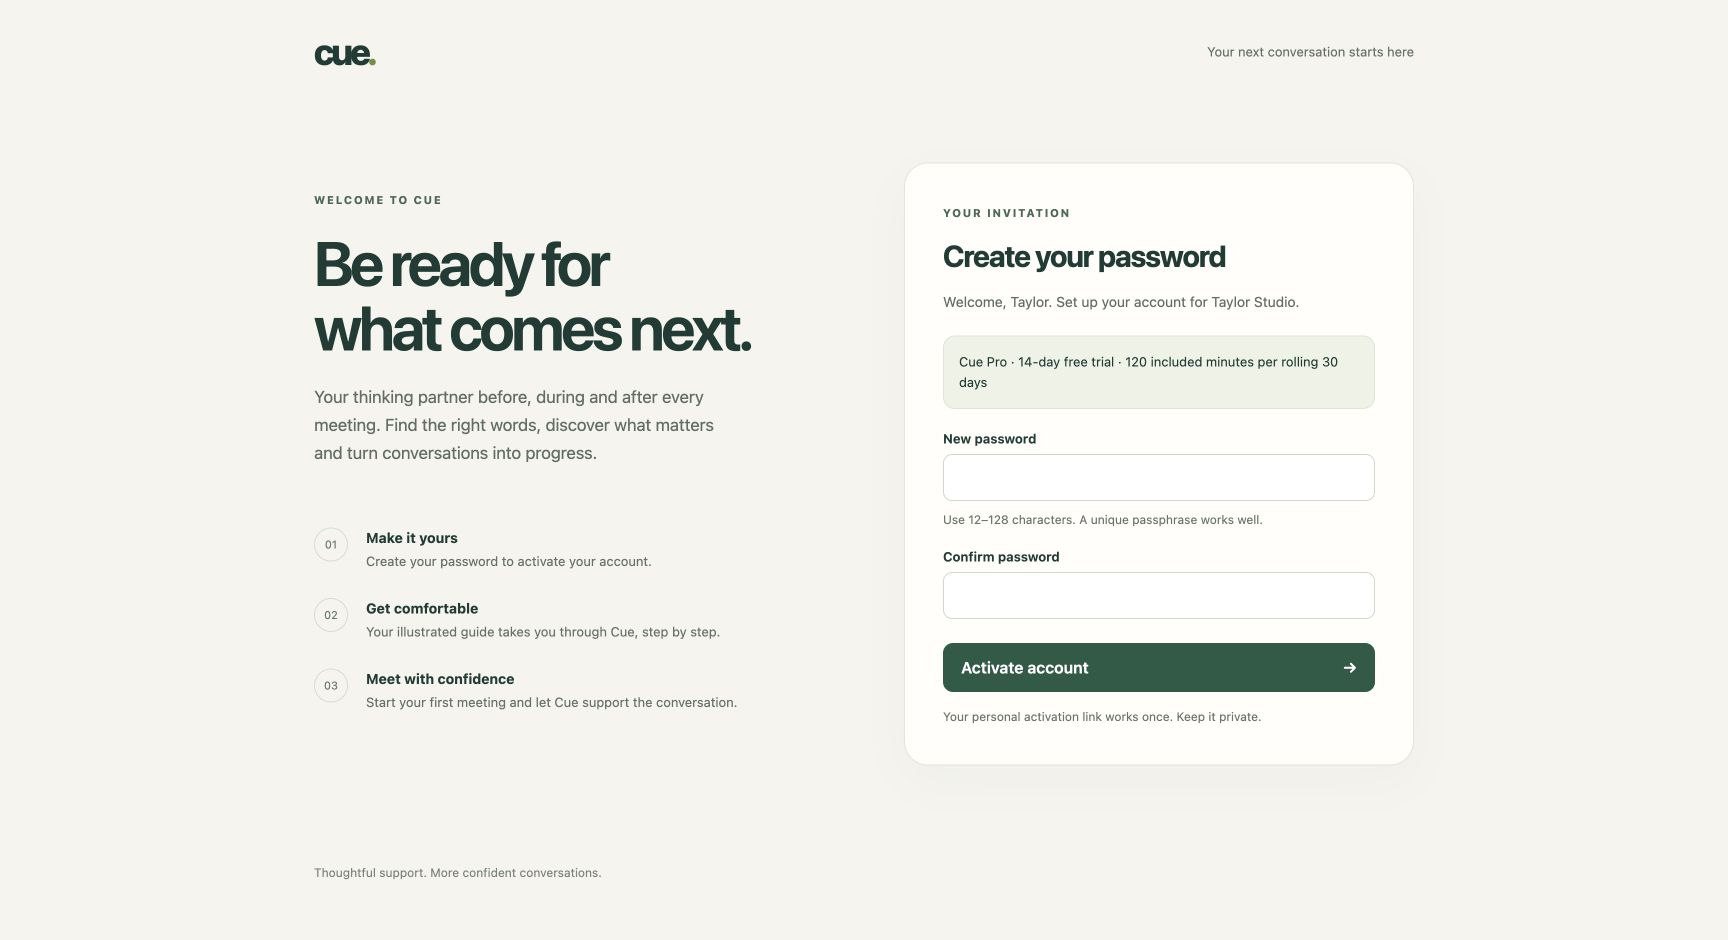
A clear place to begin.
Find your way around
- After signing in, choose Home. Use the setup checklist to Check your microphone, Tell Cue who you are, Add knowledge Cue can use live, and Connect your calendar.
- Use the left navigation: Calendar for upcoming conversations; Library for saved meetings; People for relationship context; Insights for reflection; and Ask Cue for questions.
- Open Settings to personalize your workspace, Billing to review your plan, or Support for help. Controls depend on your workspace role and plan.
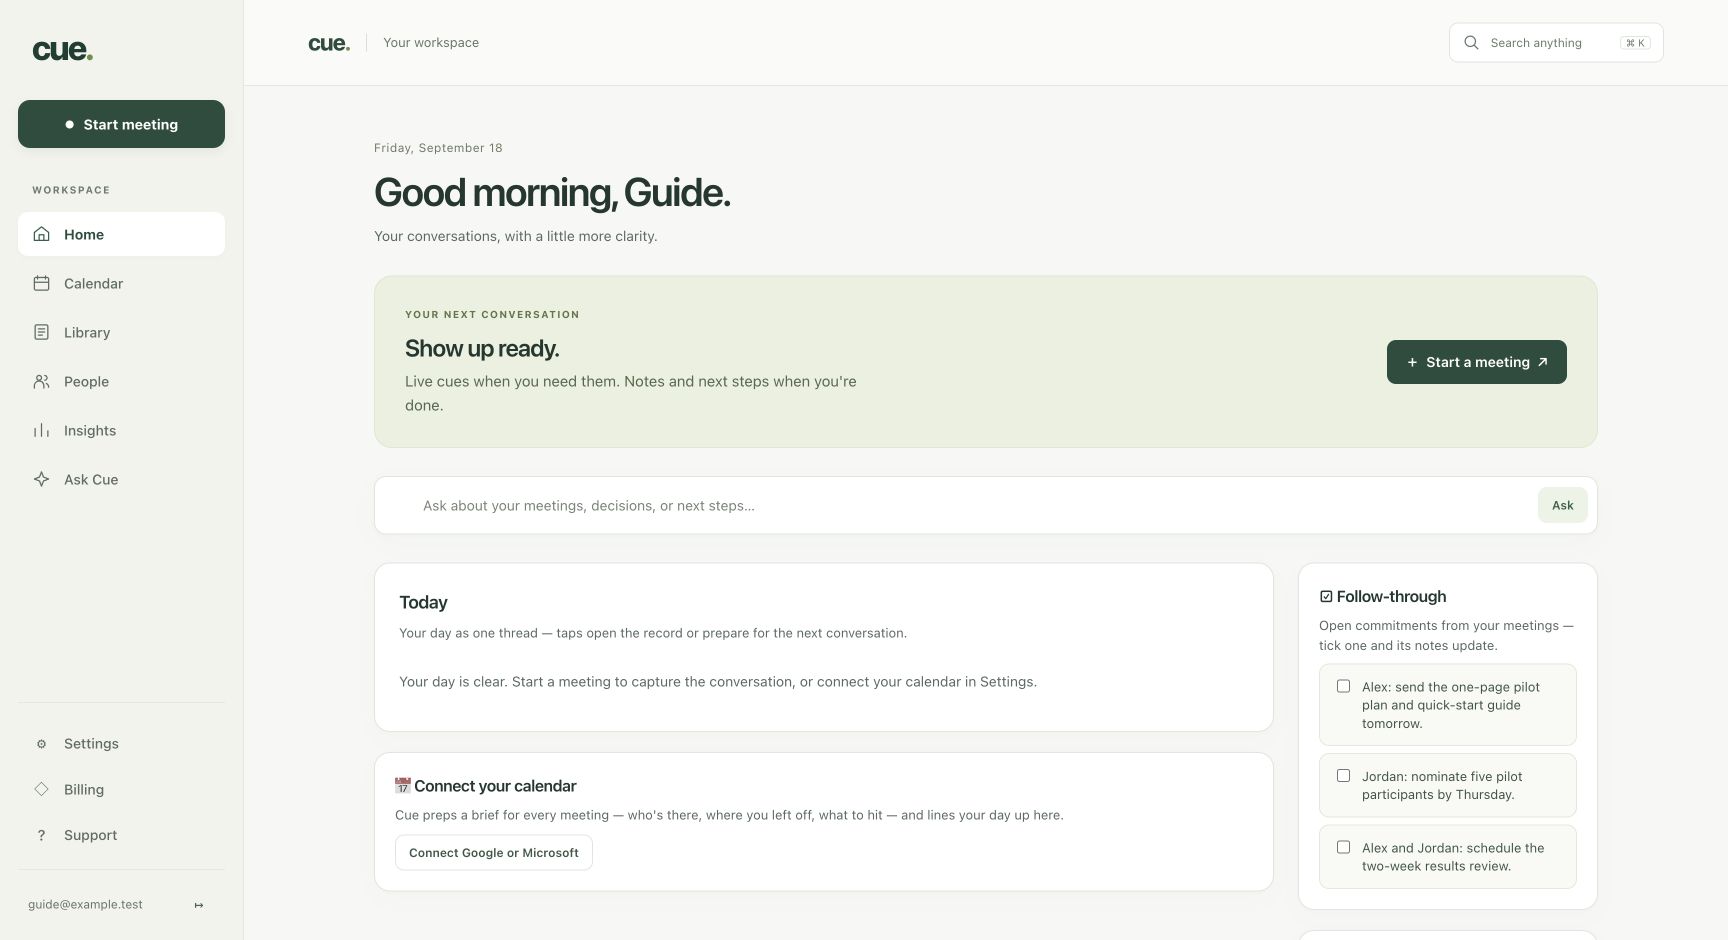
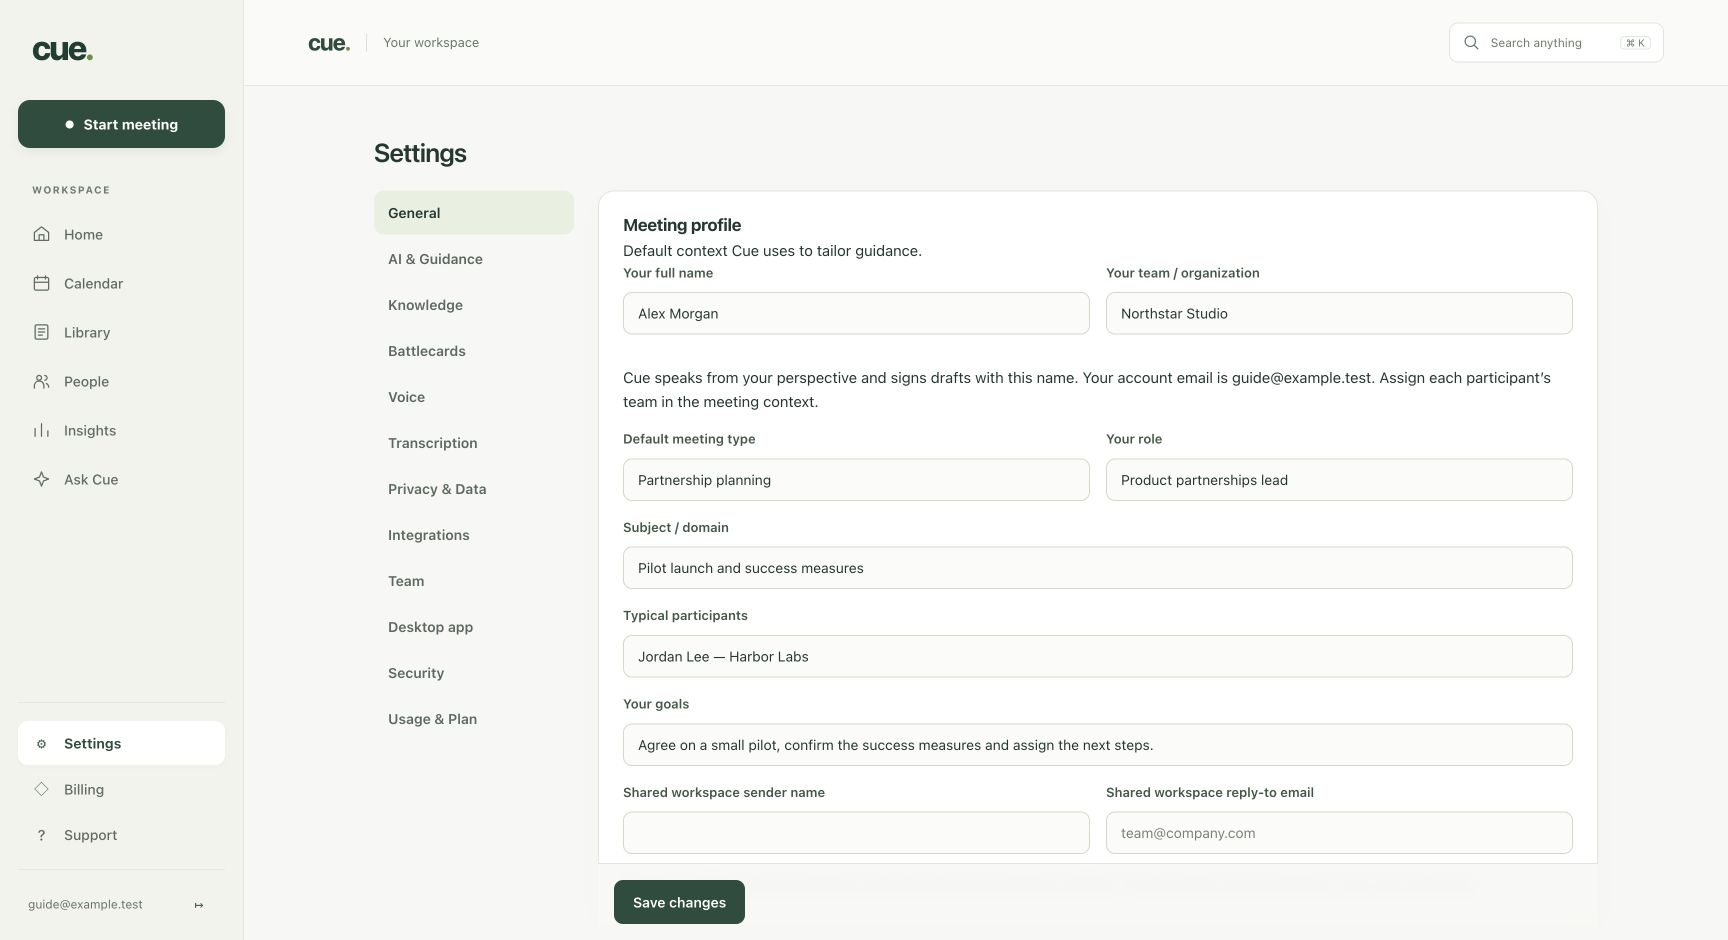
Guidance that sounds like you.
Set your identity and context
- Choose Settings → General. Enter Your full name exactly as you want it spelled and Your team / organization.
- Add Your role, Subject / domain, typical participants, and goals. Select Save changes. This helps Cue draft from your perspective.
- Open Settings → Knowledge to add relevant material you are permitted to use. For a single meeting, use the meeting setup’s Knowledge for this meeting only instead.
- Open Settings → AI & Guidance to set Custom instructions — always applied, Response length, and language. In Knowledge, use + Add text document or Upload a file for approved reference material.
- Open Settings → Transcription to add Custom vocabulary (comma-separated). Review the scope carefully before using Fix everywhere to apply a spelling correction to saved content.
- Open Settings → Voice to review the voice-learning controls and edit the Learned voice profile. Select Save changes after changes.
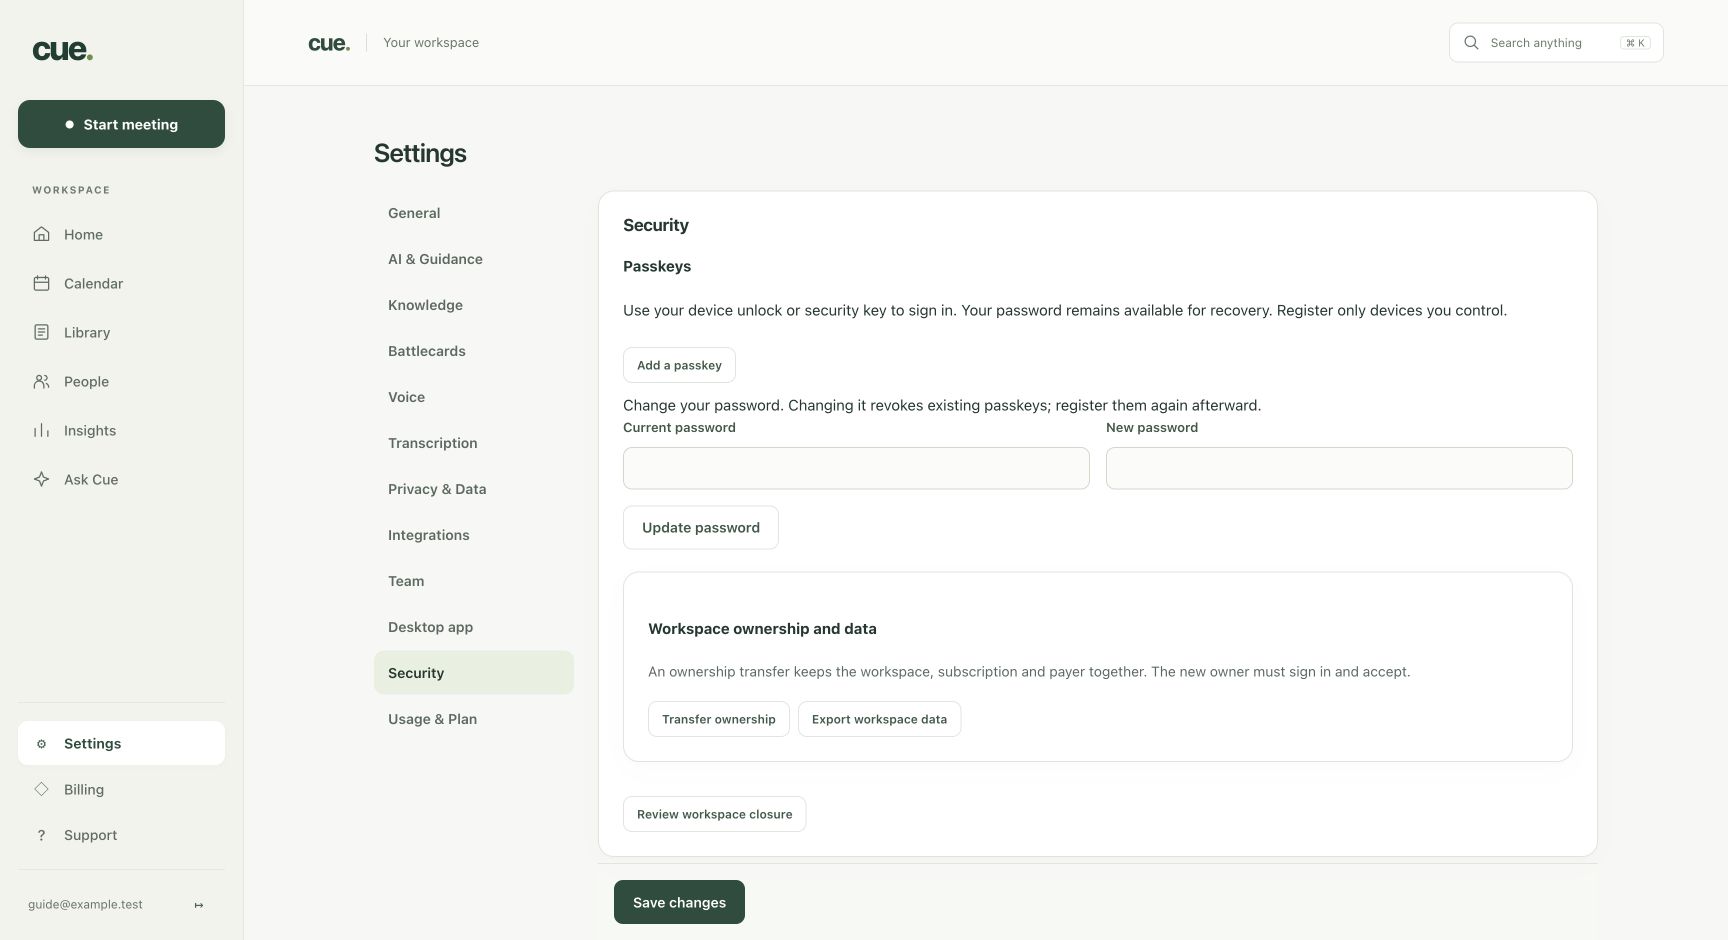
A simpler, secure sign-in.
Add a passkey
- Choose Settings → Security → Add a passkey. Enter your current password and select Continue.
- Complete the confirmation shown by your device or security key. Register only a device you control. Confirm the passkey appears in the list.
- On your next sign-in, select Sign in with a passkey and follow the device prompt. Your password remains available for recovery.
- To revoke a credential, return to Security and select Remove beside it. Changing your password revokes existing passkeys; register them again afterward.
Preparation starts before the call.
Connect your calendar and check audio
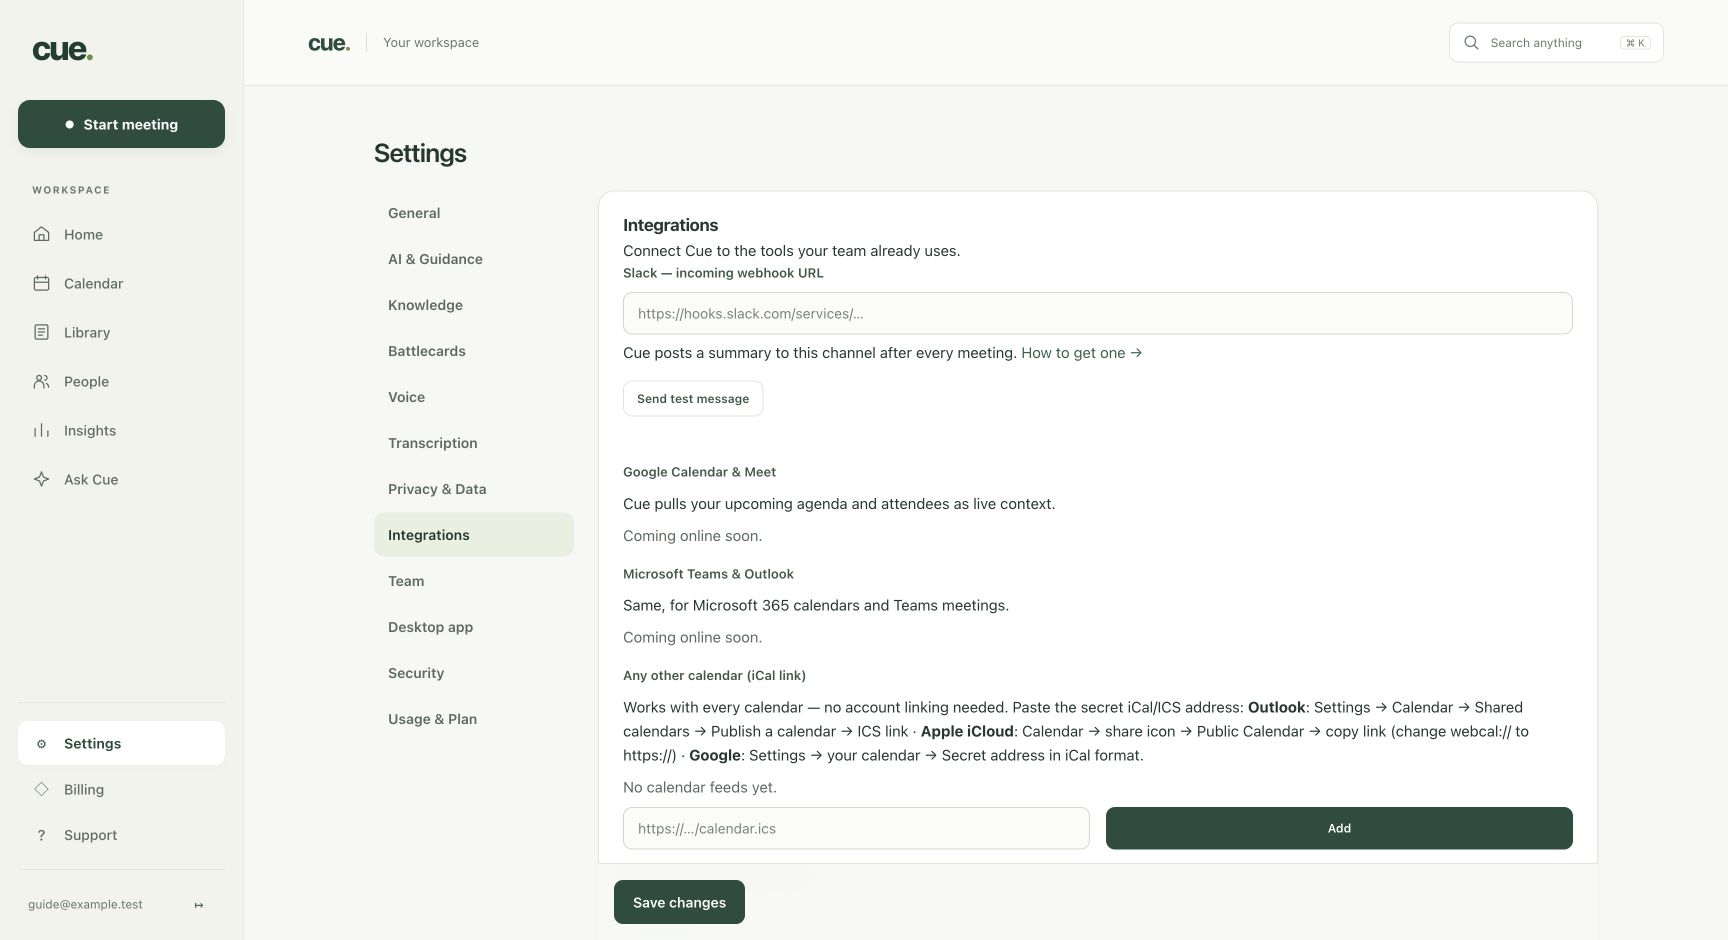
- Choose Settings → Integrations. Select Connect for Google or Microsoft and approve the requested connection for the correct account. Return to Cue and check the connection status.
- Alternatively, add a calendar’s iCal feed using the available calendar-feed controls. Keep a private feed URL confidential.
- Choose Calendar and check that expected events appear. Calendar invitations can supply attendee names and addresses when the provider exposes them.
- On Home, choose Check your microphone, allow access, and speak. Look for a detected signal. This short check stays on your device.
Give the conversation a direction.
Start your first meeting
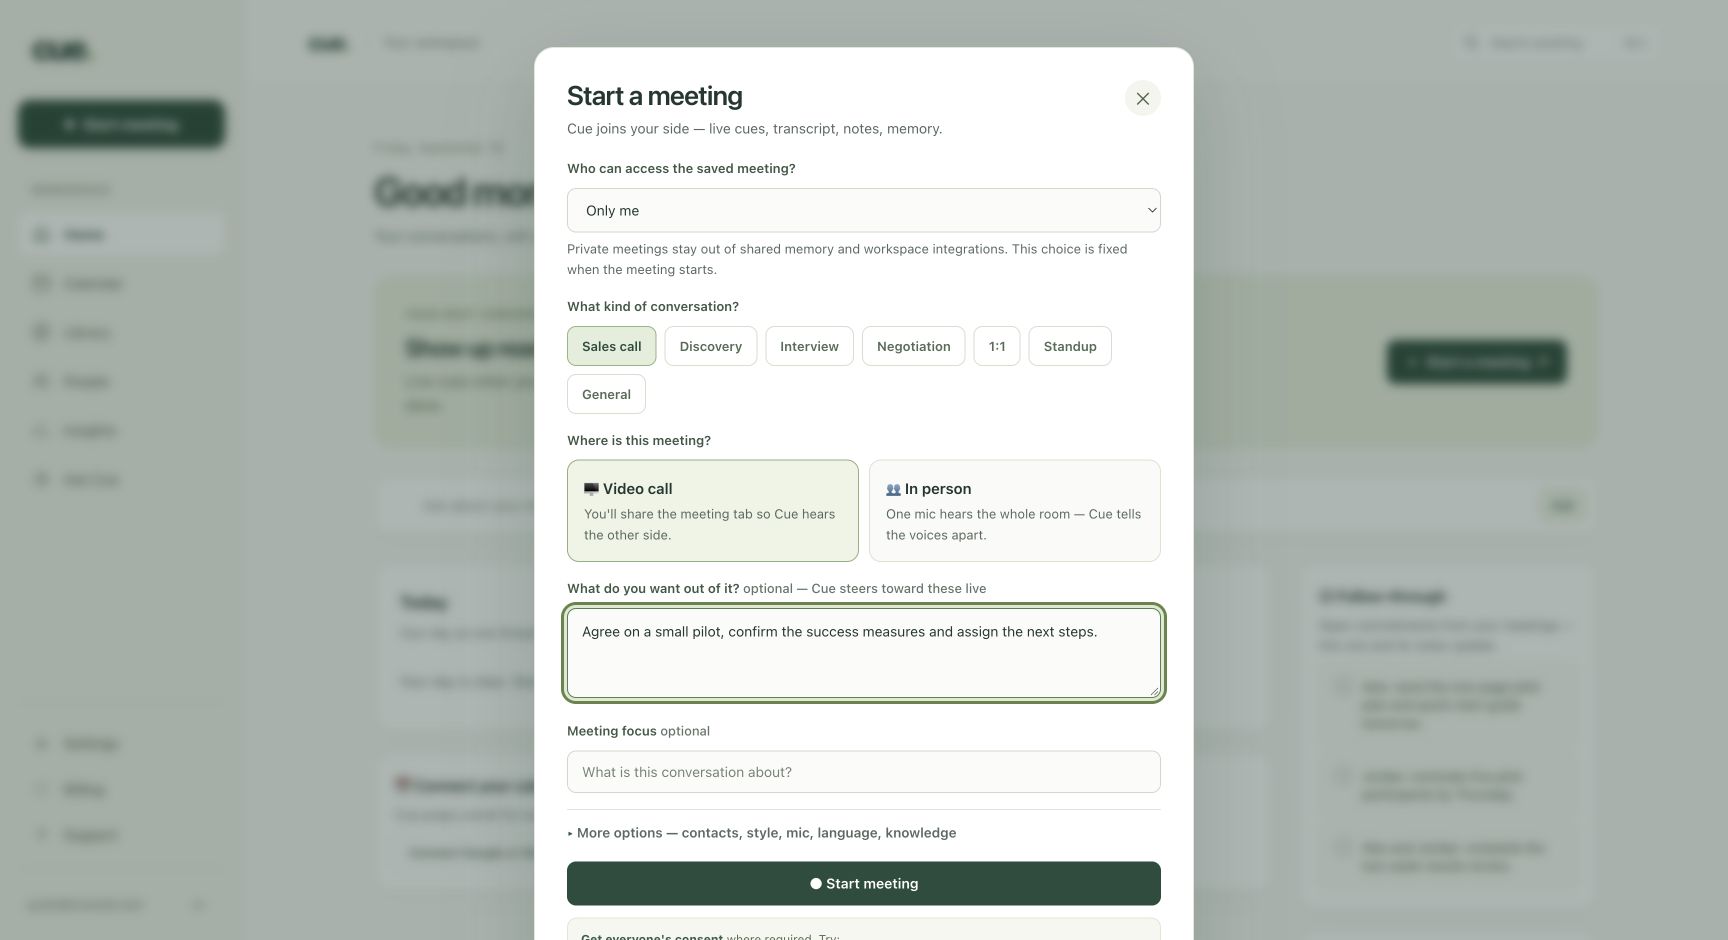
- Select Start meeting. Under Who can access the saved meeting?, choose Only me or Everyone in my workspace. This choice is fixed when the meeting starts.
- Choose the conversation type and Video call for a virtual meeting. Add an outcome under What do you want out of it? and a Meeting focus.
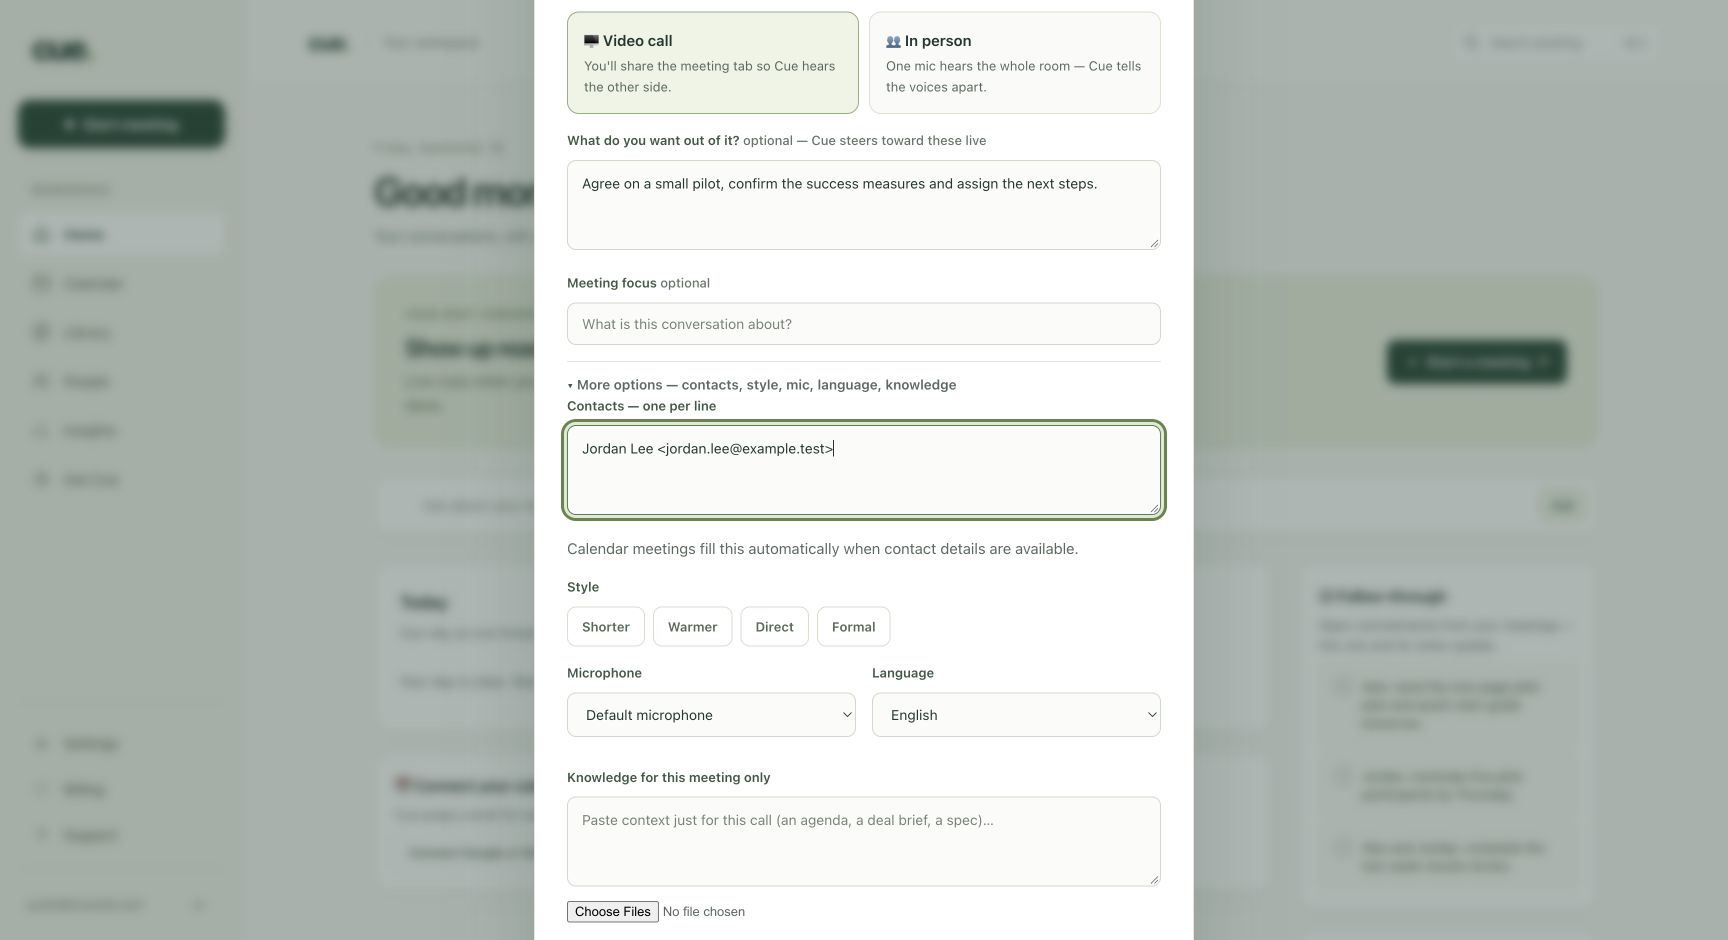
- Expand More options — contacts, style, mic, language, knowledge. Enter contacts one per line, such as Alex Morgan <alex@example.com>. Choose the microphone and language, and add meeting-specific context.
- Get participant consent where required. Select Start meeting, grant microphone access, and select the tab playing your meeting. Enable Share tab audio in the browser sharing dialog.
- Check the You and Them indicators and the live transcript while people speak. If the other side is missing, use the displayed Hear the meeting action and choose the correct audio source.
Know what to say, in the moment.
Use the live cue workspace
- Read the main cue card for a suggested next response. Choose Calm, Balanced, or Rapid to adjust how quickly suggestions can change.
- Select Cue me when you want a suggestion now, or Stronger for a bolder alternative. Use Back and Next to review available suggestions.
- Type a specific request in the Ask Cue field and select Cue it. Example: “What should I ask to uncover the approval blocker without sounding defensive?” Select Queue to prepare a line for later.
- Use Save to keep a line, Copy to copy it, and A− / A+ to adjust text size. Try Overlay where your browser supports a floating cue window.
- Select Whisper to hear cues through an earbud. Select Pause cues to hold suggestions; this does not stop audio capture. Mute controls your microphone input, not the other side’s shared audio.
Choose how quickly suggestions can change.
Request guidance or a bolder alternative.
Ask now or prepare a line for later.
Review suggestions and keep useful lines.
Listen, float the card, or resize text.
Pause suggestions, mute your mic, or finish.
The right voice. The right team.
Keep participant context accurate
- In the live workspace, open Meeting context using the context-edit control. Review the meeting focus and the participant details available there.
- Correct names and known email addresses. Assign participants to your team or the other team using the available team controls. Do not infer a person’s organization solely from their name.
- Review the participant list for Your team, Other team, or Team not assigned. Resolve missing information when you know it.
- If speaker labels are uncertain, use the voice-identification controls and review the transcript. An inferred voice label is not a verified identity.
Turn the conversation into clarity.
End, review, and ask your meeting
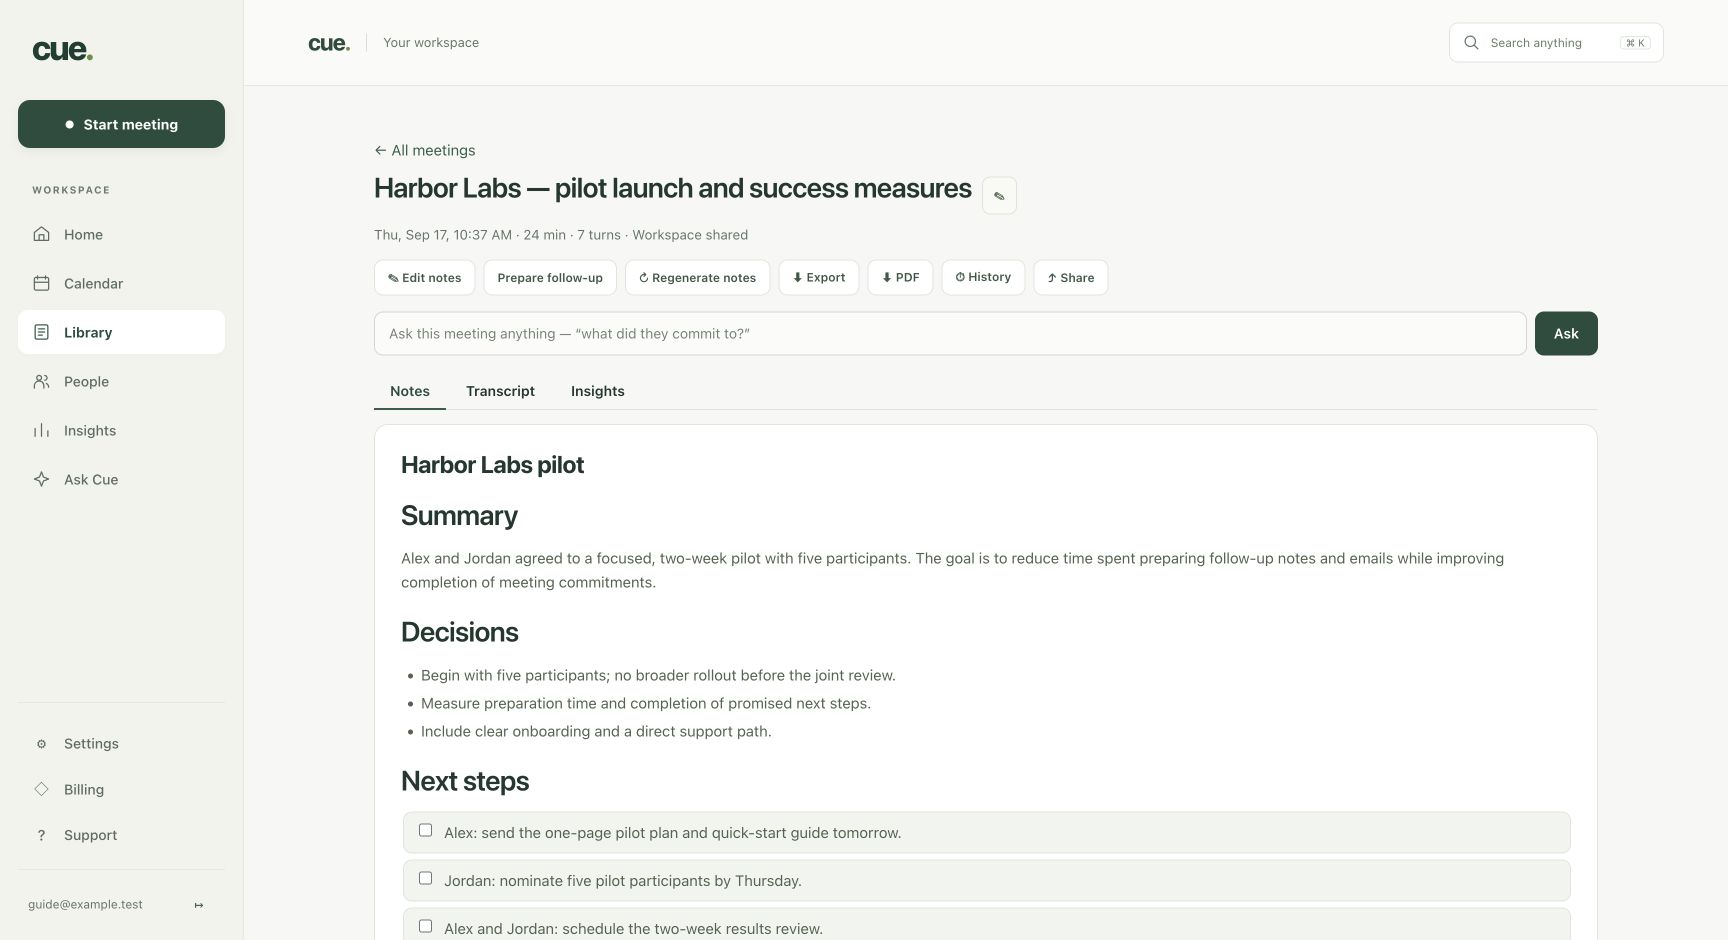
- Select End meeting. Allow the saved meeting to finish processing, then open it in Library.
- Review Notes, Transcript, and Insights. Check decisions, dates, responsibilities, and next steps against what was actually said.
- Type into Ask this meeting anything and select Ask to ask a specific question. For example: “Which approval remains unresolved, who owns it, and what evidence did they request?”
- When an answer provides a source control, select it to inspect the supporting transcript turn. If Cue reports insufficient evidence or partial coverage, review the full transcript before treating the answer as complete.
- If saving is not confirmed, keep the tab open, use Export transcript, and select Check Library. Do not assume an interrupted save has finished.
Keep the momentum after the call.
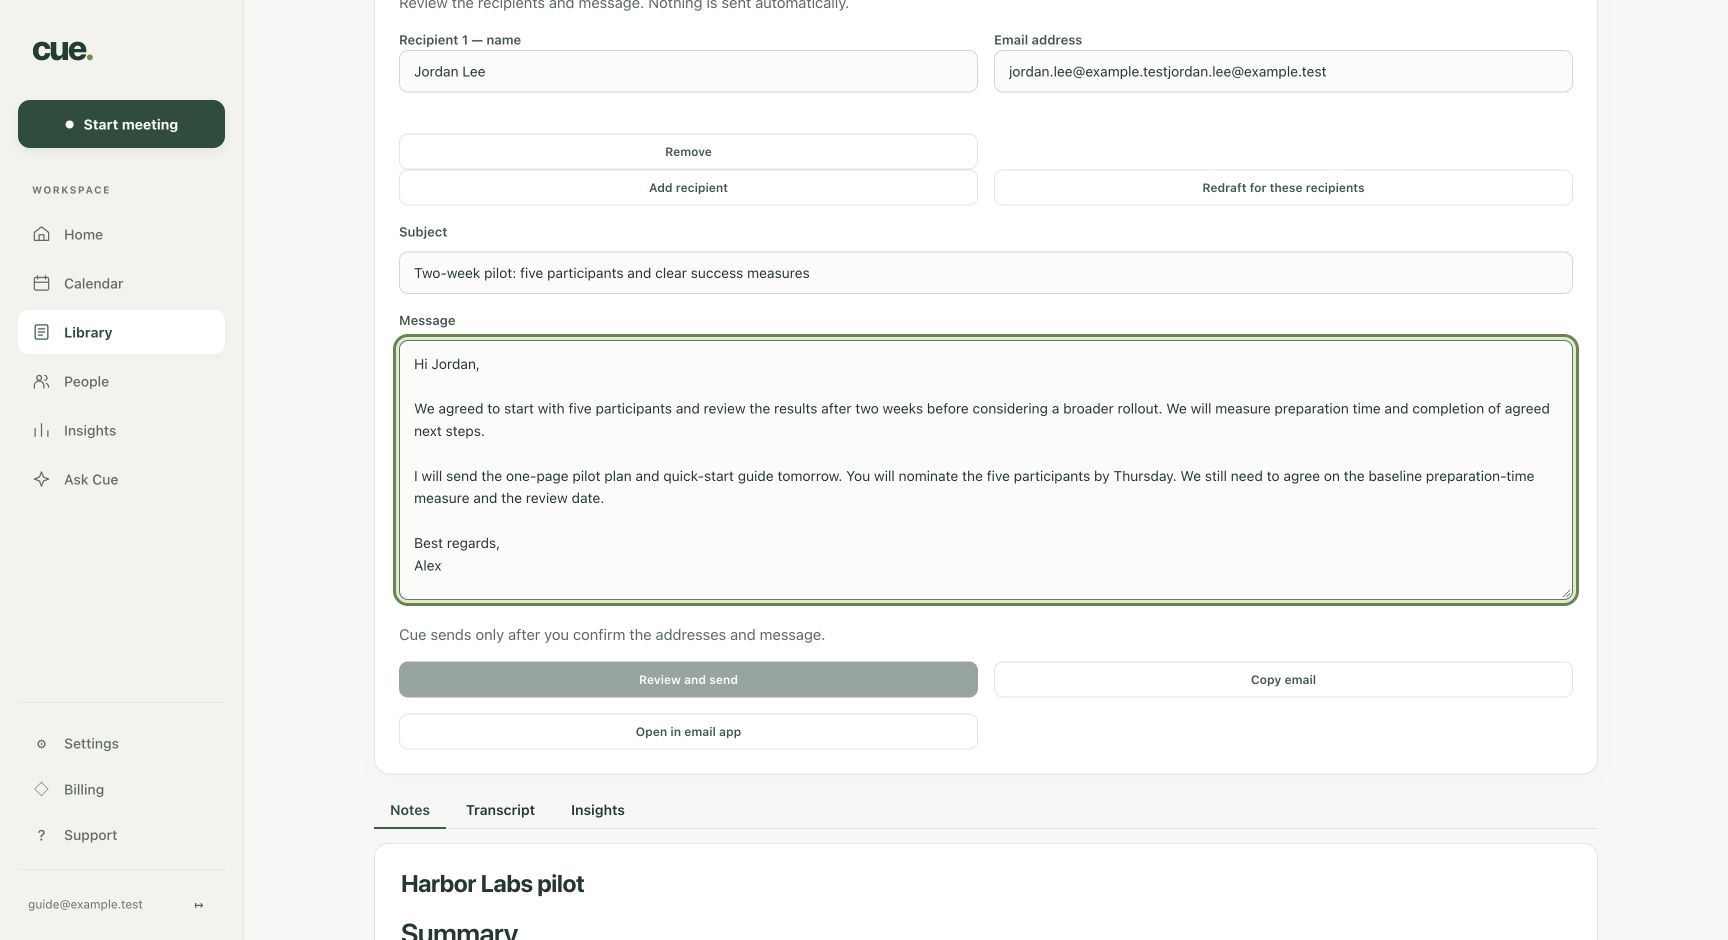
Review and send a follow-up
- Open the saved meeting in Library and choose Review ready follow-up or Prepare follow-up, depending on its status.
- Review each recipient’s name and Email address. Select Add recipient for a shared follow-up, up to five recipients. Remove anyone who should not receive it.
- After changing recipients, select Redraft for these recipients. Check the greeting, commitments, dates, owners, and audience-appropriate detail.
- Edit the Subject and Message. If shared-mailbox sending is available to your role, choose Review and send and confirm the final addresses and content.
- For private meetings or when shared-mailbox sending is unavailable, use Open in email app or Copy email and send through your own email account.
Every conversation builds context.
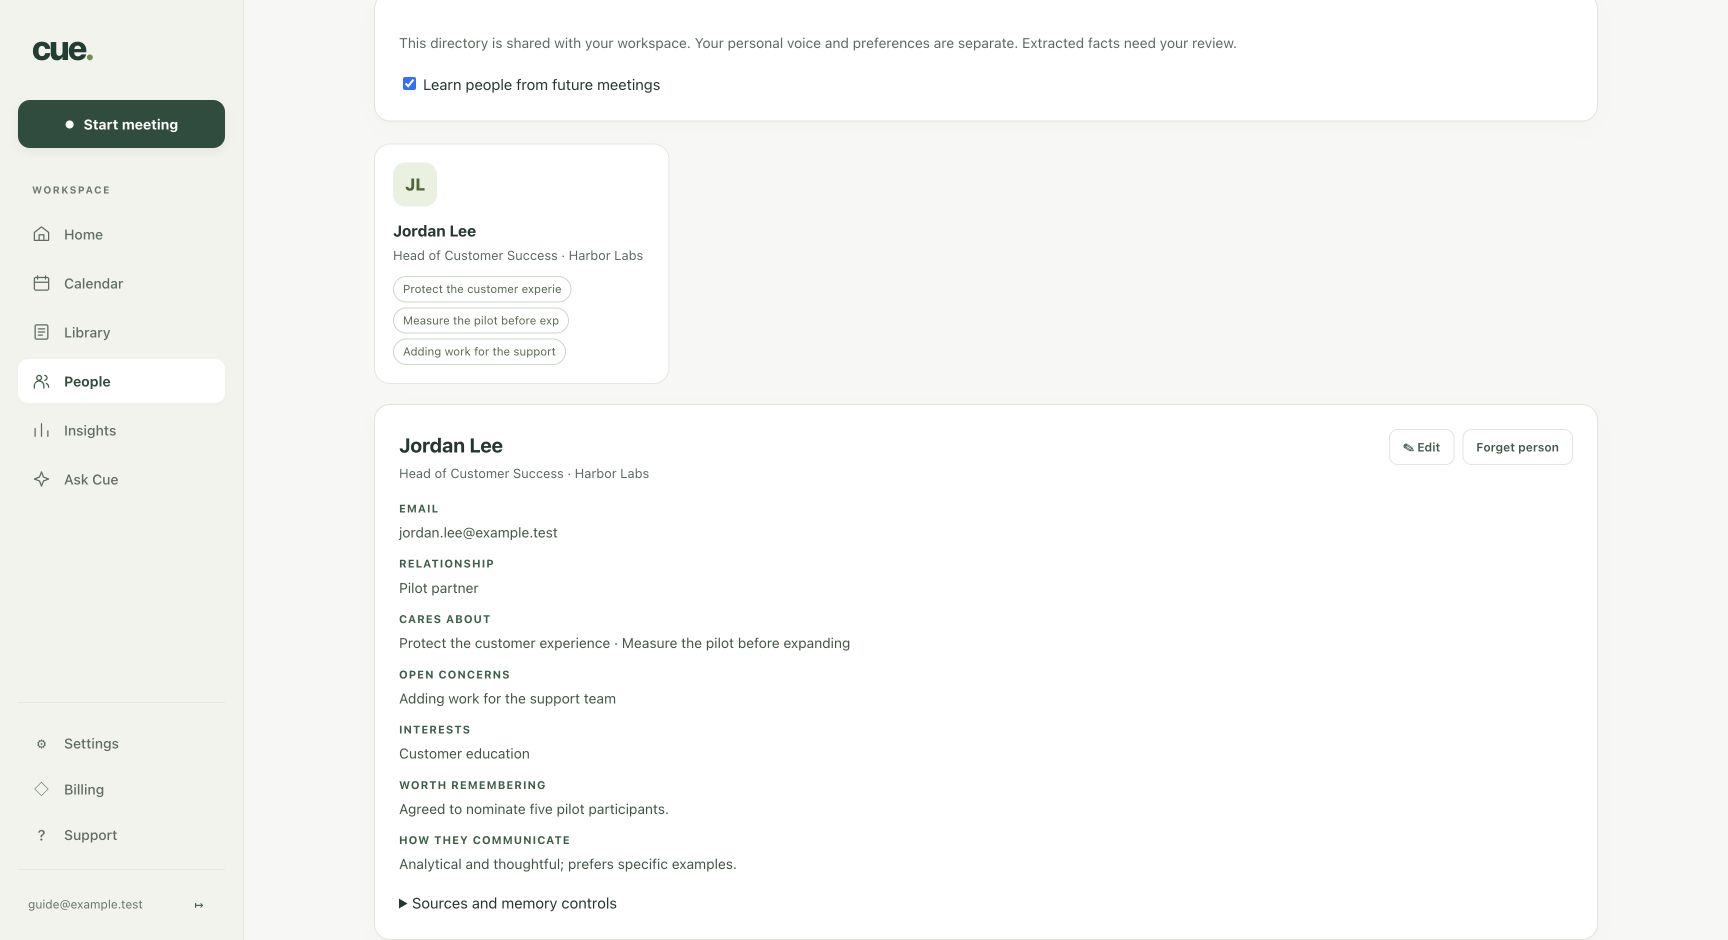
Use People and your meeting history
- Choose People and open the relevant person to review available relationship context and meeting history.
- Check names, past commitments, and relevant details before a follow-up conversation. Correct inaccurate context through the available editing controls.
- Use a connected calendar or provide the person’s contact details when starting the next meeting so Cue has a stronger match.
- Choose Insights to review the available reflection and improvement information. Use Ask Cue for broader questions within the information your account can access.
Share deliberately.
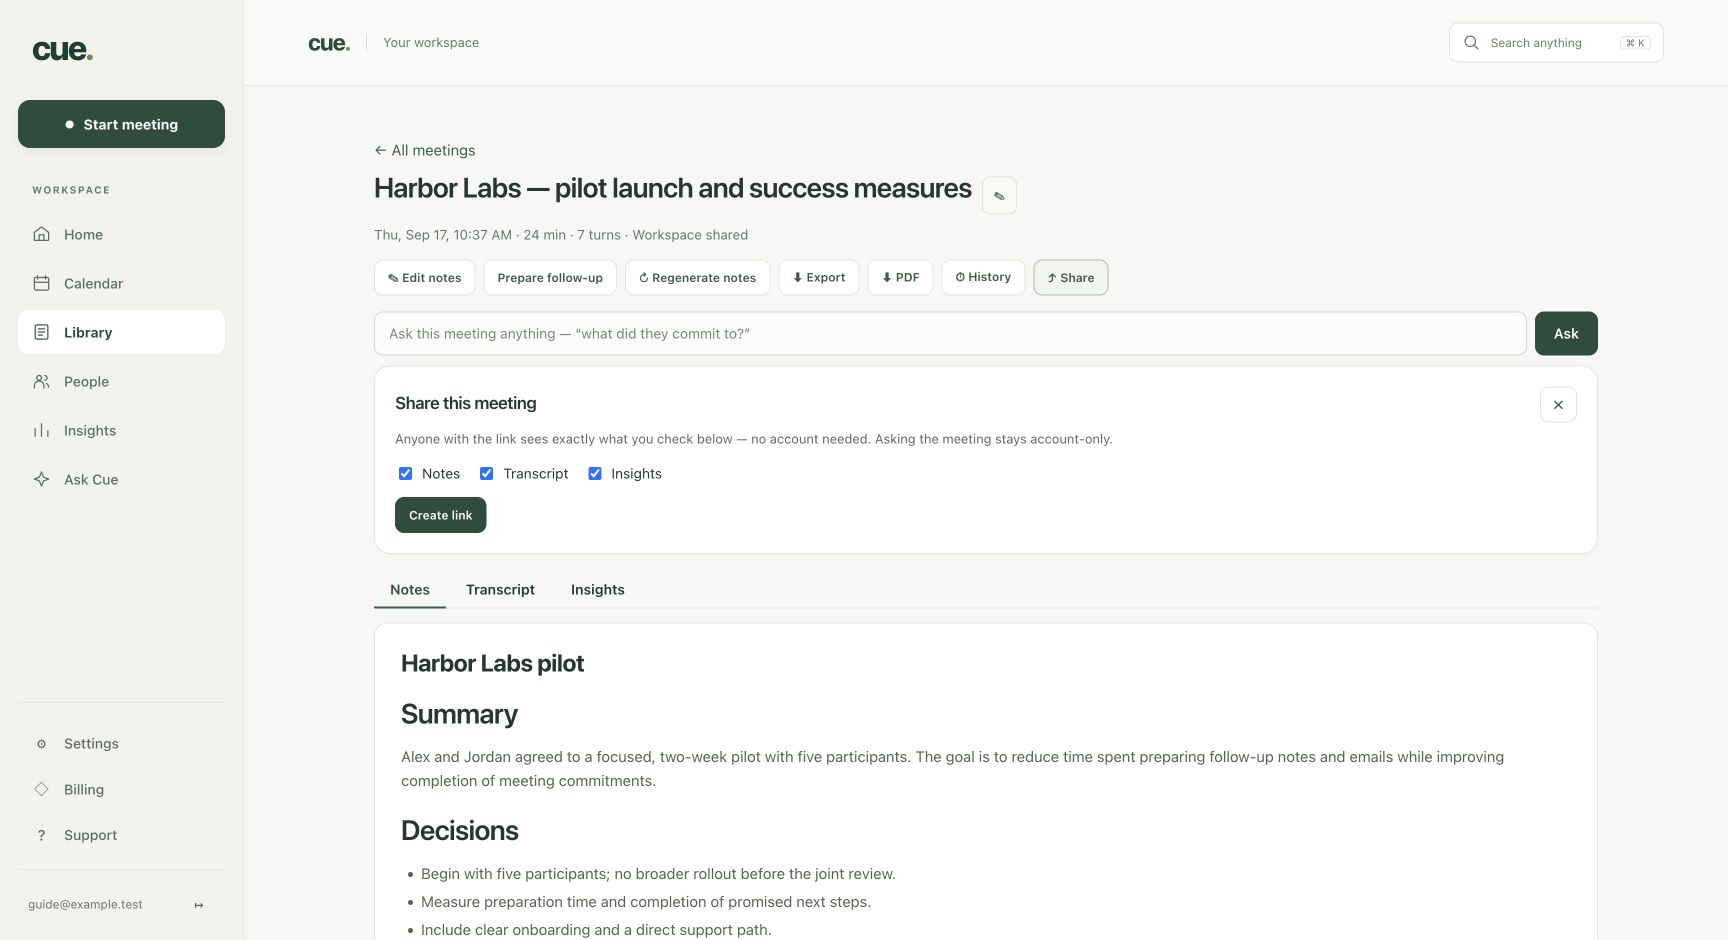
Find and share saved meetings
- Choose Library, find your meeting, and open it. Review its content before sharing.
- Select Share. For an eligible workspace meeting, choose the sections to expose: Notes, Transcript, and/or Insights. Select Create link.
- Use Copy or Open to review the resulting link. Anyone with that link can see the selected sections without an account.
- Return to Share to Update link or Revoke link. Asking questions about the meeting remains account-gated.
- For private meetings, use Share a copy → Copy notes or Save as PDF. Cue does not create a public link for a private meeting.
Return to the original conversation.
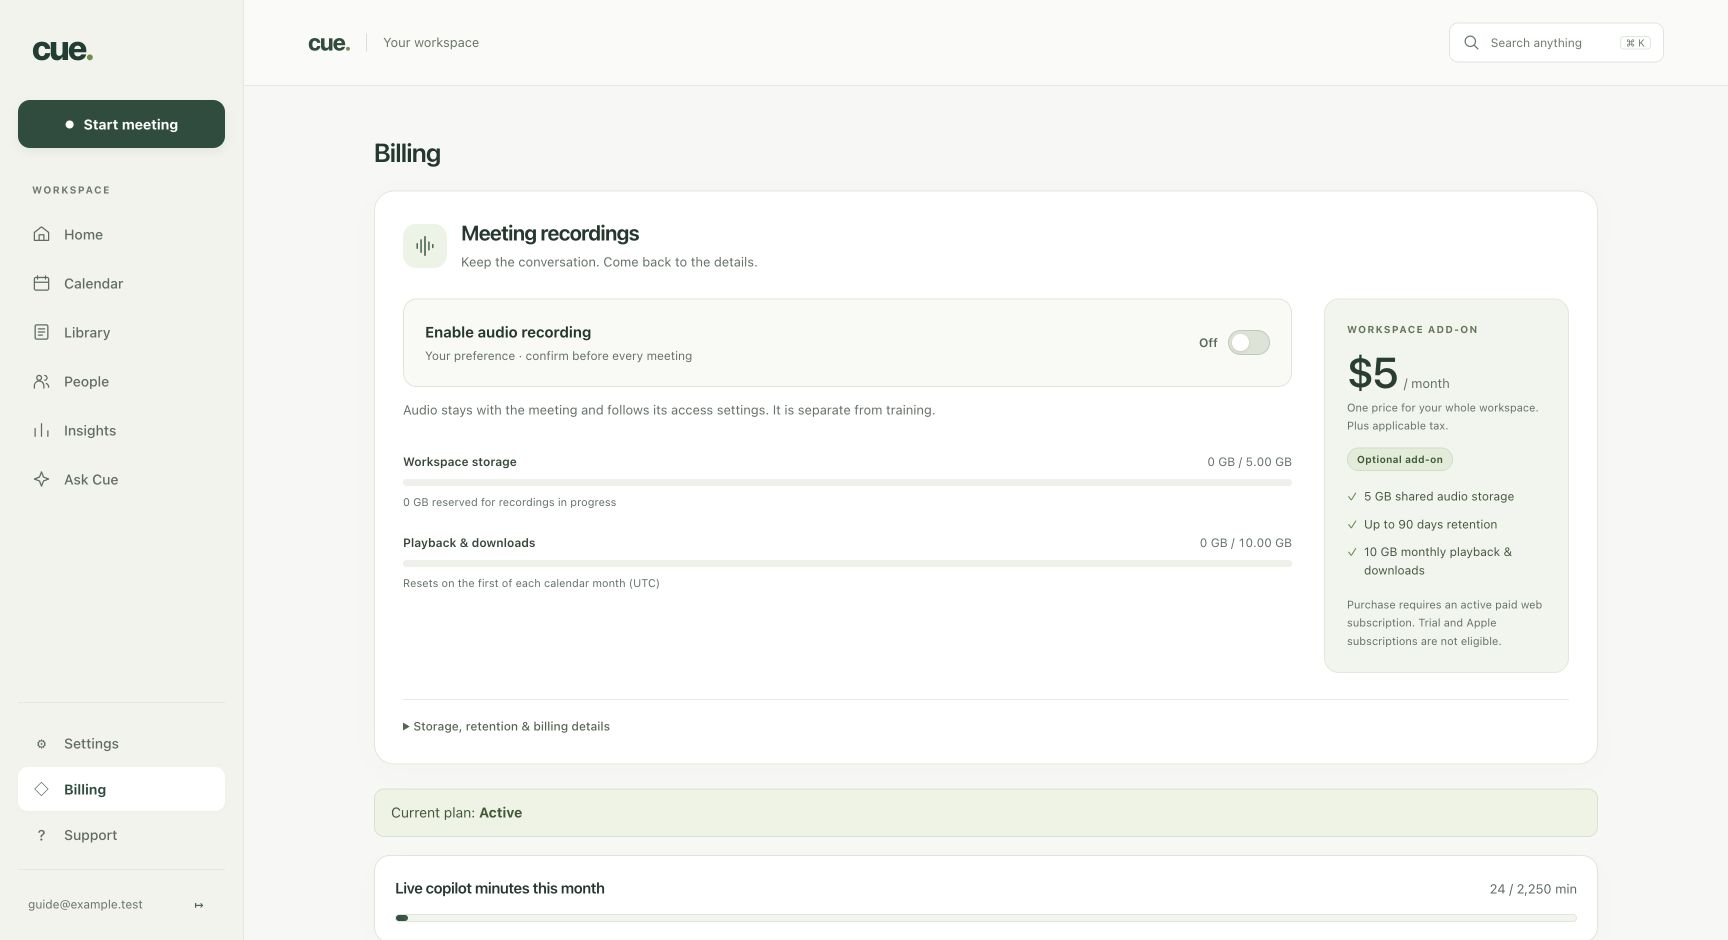
Optional meeting audio
- Open Billing to review the recording add-on and current eligibility. The workspace owner can select Add meeting recordings, review the terms, and Continue to checkout.
- Open Settings and locate Meeting recordings. Turn Enable audio recording on or off for your account. This is separate from optional training collection.
- During a meeting, select Record audio and confirm the recording notice after obtaining required consent. Recording requires an active add-on and your enabled preference.
- After the meeting, open it in Library → Meeting audio. Select Play recording or Download. Review the displayed availability deadline.
- To remove audio, select Delete and confirm Delete audio. Notes and transcript remain. To stop future renewal, use Manage renewal in the add-on controls.
Understand your allowance.
Plans, offers, and extra usage
- Choose Billing. Review your plan, renewal details, and any trial, complimentary access, or discount terms. A time-limited discount does not imply a permanent price. Corporate complimentary and trial grants share their included minutes across seats in a rolling 30-day window. Their access expiry is separate, and they do not automatically incur overages.
- In Your meeting minutes, review Minutes used, Included minutes available, Additional usage, and the reset date. The allowance applies across the workspace.
- If an optional new-terms offer is displayed, the owner can review the rate, effective date, and policy. Enter a Monthly extra-spend ceiling, check the consent box, and select Accept usage terms only if you agree.
- Choose a $0 ceiling to disable additional paid usage under those terms. Read Current terms and any Accepted · Starts next period notice to distinguish active from scheduled terms.
- Review Additional usage billing for settlement status. If an amount or offer appears wrong, open a support case before making another purchase.
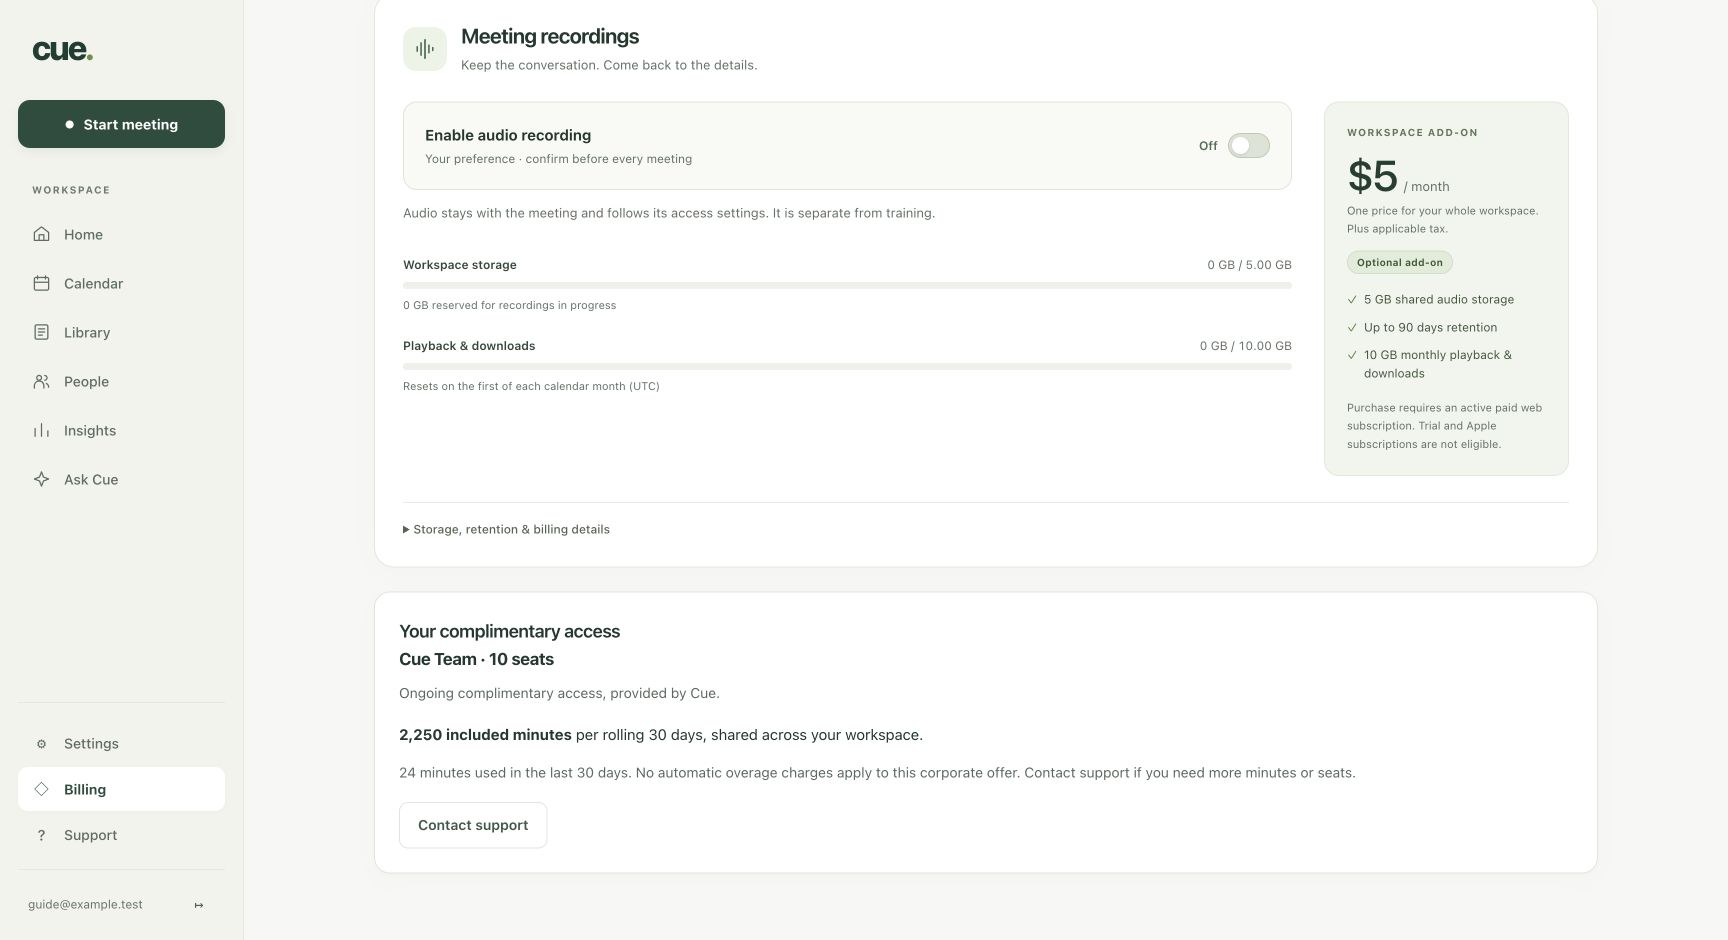
Work together with clear access.
Manage your workspace team
- If you are a workspace owner or admin, choose Settings → Team. Review existing members and their roles.
- Enter the intended teammate’s email and select an appropriate Invitation role, then select Create invite link.
- Share the invitation only with its intended recipient and check its expiry. An invitation bound to an email can only be accepted by that email.
- Review access periodically and remove members who no longer need it. Corporate administration and workspace membership are separate levels of authority.
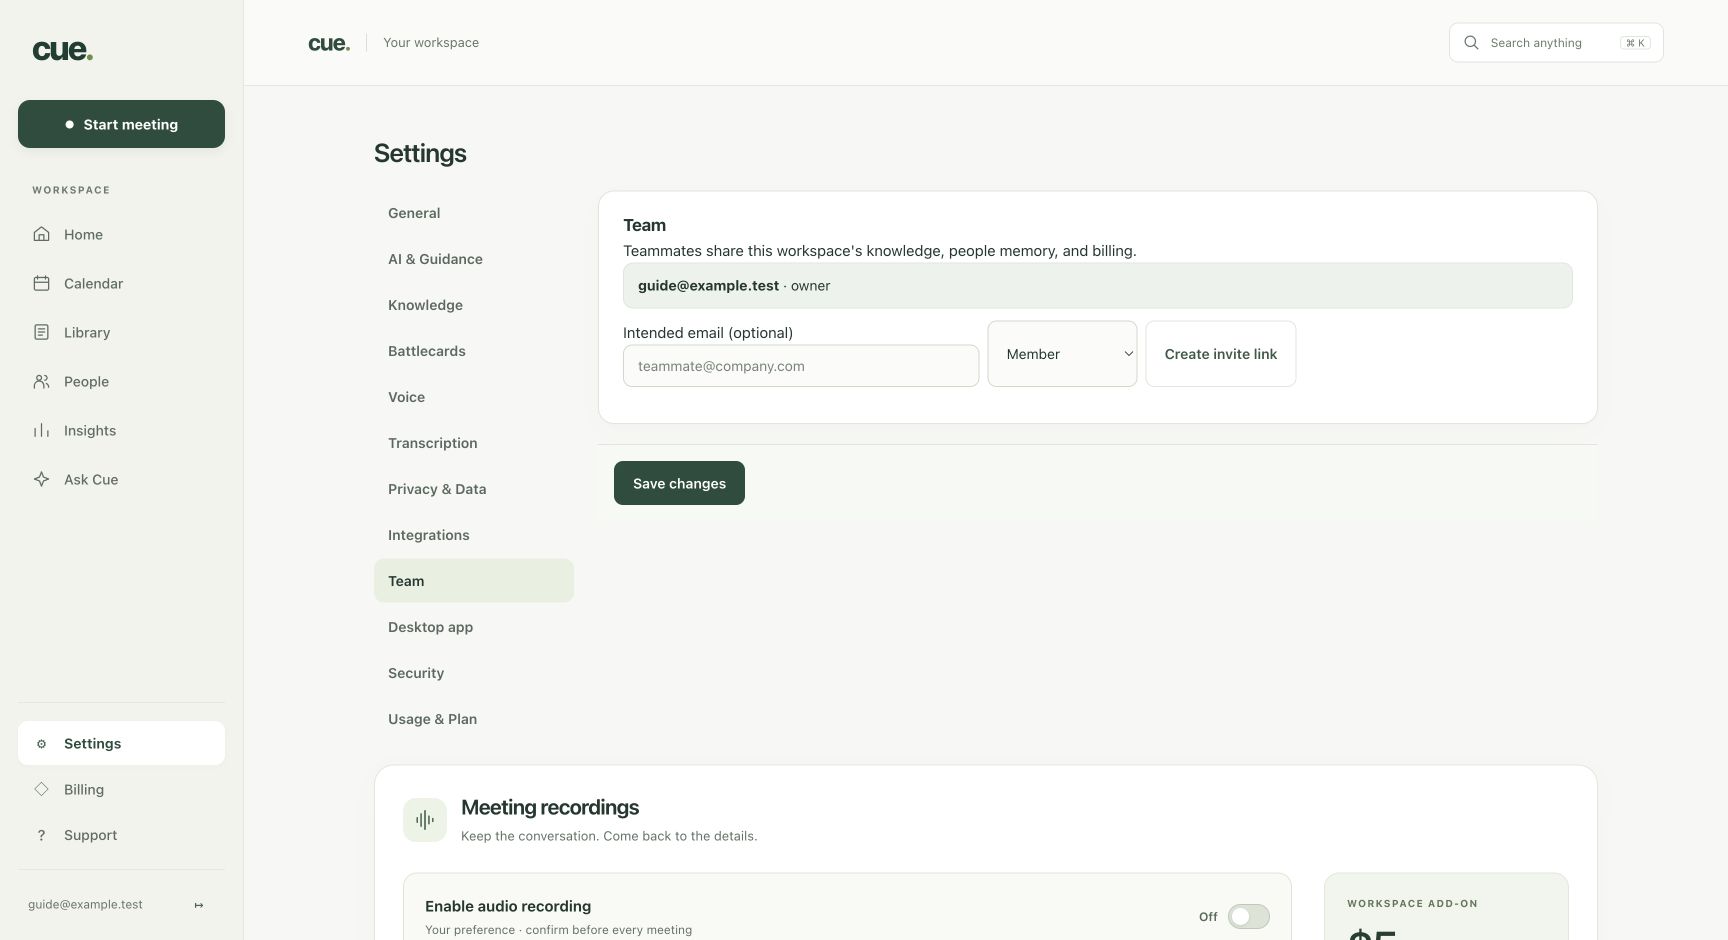
A direct line to the Cue team.
Create and follow a support case
- Choose Support in the left navigation. In Create a support case, enter a clear Subject and describe the issue in How can we help?.
- Include the screen, approximate time and time zone, steps taken, expected result, and the exact non-sensitive error message. Do not include passwords, invitation links, or private meeting content you do not need to share.
- Select Create case. Confirm the case appears in Your cases. If a submission is unconfirmed, check the list before retrying.
- Open the case to see its status and replies. Use Reply to this case → Message → Send reply to continue in the same conversation.
- Watch for New reply and the Support navigation indicator. Select All cases to return to your case list.
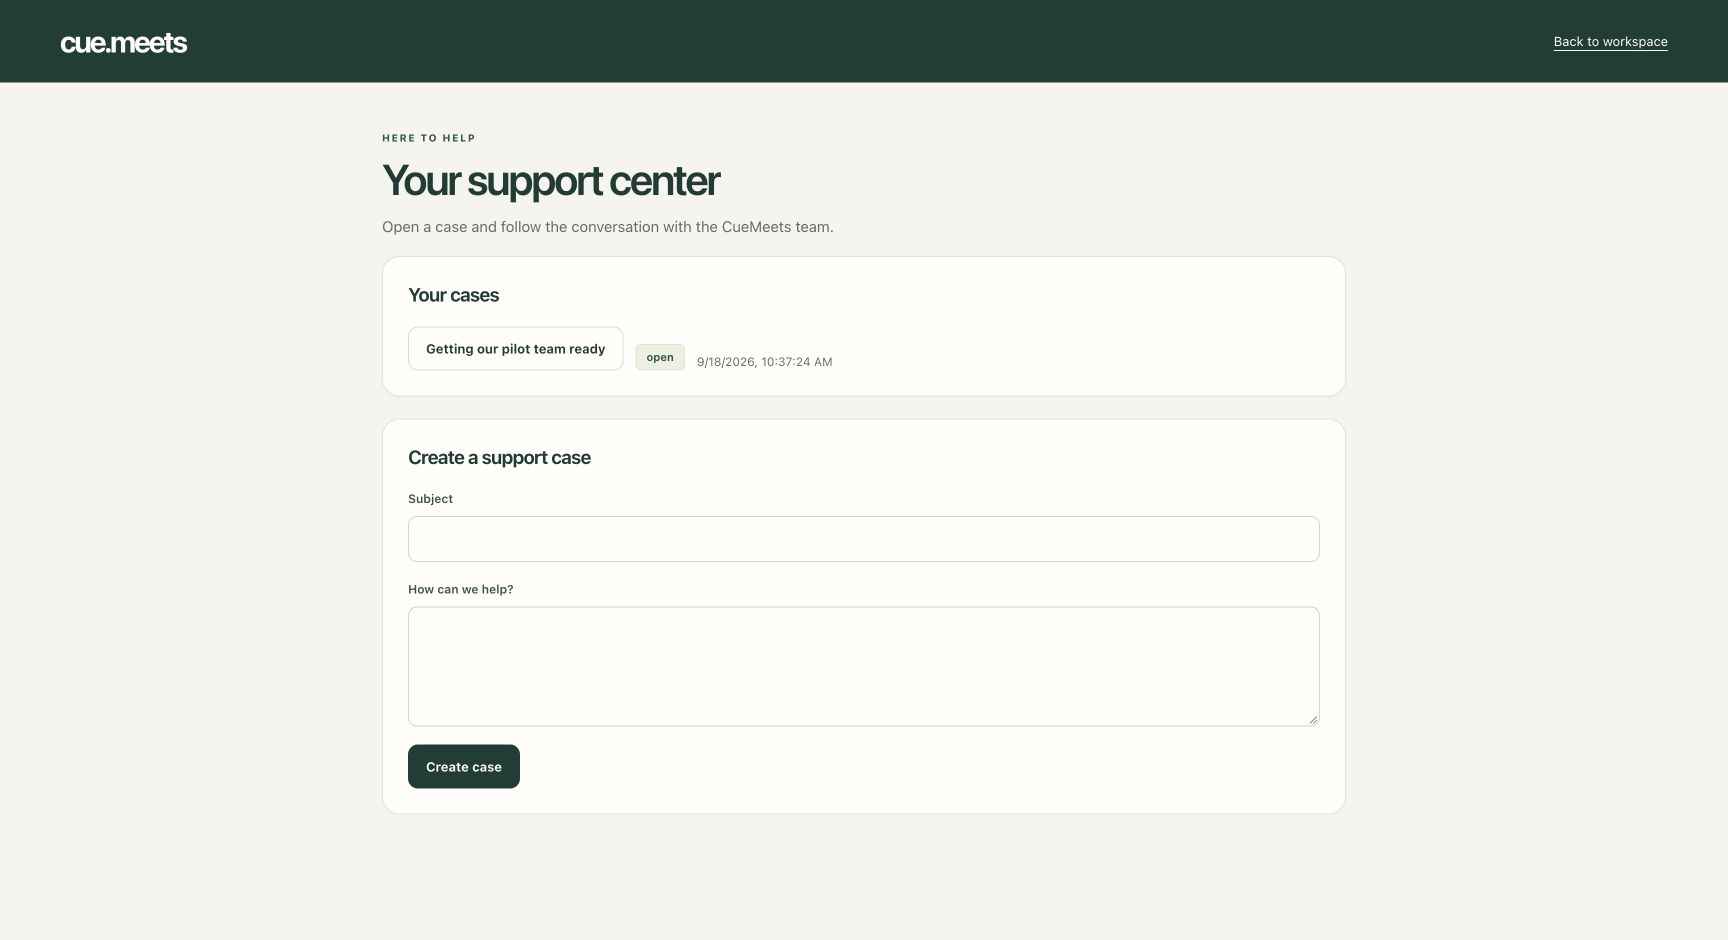
Keep control of your information.
Privacy and troubleshooting
- Before a meeting, choose its saved-content visibility deliberately and obtain any required participant consent. Open Settings → Privacy & Data to review available privacy and data controls.
- In Privacy & Data, review Store full transcripts and Auto-delete meetings older than. Transcript-based answers depend on retained source material. Training audio opt-in and paid meeting recordings are separate controls; review each deliberately and select Save changes.
- If cues are missing, check the live transcript first, then microphone and shared-tab audio, connection status, Pause cues, and available allowance. Try Cue me after a clear spoken exchange.
- If calendar events are missing, check which account is connected and whether the event belongs to that calendar. If a contact email is unavailable, enter the known address rather than guessing.
- If audio recording stops at a limit, the meeting can continue. Check the recording status in Library and storage/playback allowance in Billing.
- If a passkey prompt is canceled, retry or sign in with your password. For unresolved problems, create a support case with the steps and non-sensitive error text.
Guidance, with you in control.
Ask the help assistant
- Choose Help assistant in the workspace navigation. Ask how to use a Cue feature or describe a problem. Use Illustrated guide for the illustrated walkthrough, or download this guide as a PDF.
- The assistant uses this guide to explain Cue. Follow its chapter links for detailed steps. It does not inspect your meetings or transcripts; use Ask Cue for meeting questions.
- When an answer offers an action, review it first. The assistant can open a workspace screen, propose changing your recording preference, or prepare a support case.
- For a recording change, confirm the proposed setting. Recording still requires paid or complimentary access and any required participant consent. The assistant cannot purchase access for you.
- For support, review and edit the subject and message before submitting. Keep passwords, private links, and unnecessary meeting details out of your message. Confirm the case appears in Support.
- If an action cannot be confirmed, check the setting or support case list before retrying. If AI help is unavailable, the guide and Support remain accessible.